Re: Help me learn to use DPs grid... PLEASE!
Posted: Sun Aug 01, 2010 9:35 am
Actually, this is the tips and tricks forum. There is a Tips Sheet that you can access through this forum. It has many tips, but a lot of them are outdated by changes in DP since version 6.0, a couple of years ago. I need to update it, but just haven't done that yet.
James, you're right. It's the C key for the Scissors. I don't know what I was thinking when I wrote that, but it is and always has been the C key.
Benmrx, I apologize for my mood swing last night. Please feel free to ask for all the help you need. After Bongo's last post, I tabbed over to DP and started using the pencil tool at very high zoom levels. While it may seem odd and inconsistent, it's actually VERY consistent, and it behaves as an absolute grid unless you toggle it off with the Command Key. You will understand momentarily.
The "keys" to understanding the pencil tool are:
1) Grid - if the grid is on, the click will place the note on the nearest gridline to the left of the pencil tool. That is "absolute grid." Not relative. Absolute. Set the spacing of the gridlines by typing in the note value in the time-format you are using. Thus, 0|240 is an 8th note. 0|120 is a 16th. 1|000 is a quarter note. And so on.
2) Click-Drag - Click places the note. Drag determines the length. With grid on, both the click and the drag are constrained to the nearest gridlines. The click goes to the nearest gridline to the left. The drag goes to the nearest gridline to the left OR right, whichever is closer.
3) Command Key - toggles the grid off for the click, And/Or toggles the grid off for the drag.
4) 2nd Click on the Same Note - erases the note you just clicked into existence. The pencil has an eraser!
5) Next Insert - your first click-drag determines the length of all subsequent notes until you click-drag again. You can make the notes any length. Click-click-click… very fast.
Now, I will repeat the above in a more userly-fashion:
The behavior of the pencil tool at normal zoom levels (Shift-Command-N for the default zoom level), is quite nice, actually. With the grid on, it will peg any click of the pencil directly onto the beat or subdivision of the beat. That's an absolute grid. Once you click, you hold it down and drag until you've got the length you want. If you want odd lengths, you press the command key while holding down the mouse button, then drag to the desired length.
After the first click and drag, DP's Pencil tool will attempt to make each following note-click the very same length as the first click-drag. In other words, once you tell DP how long you want the notes, it will make them all that length until you tell it to change.
When you want a new note-length, you just click-drag again as described above. Now you've told it a new length, and it will make subsequent clicks the same length unless you add the drag to your click.
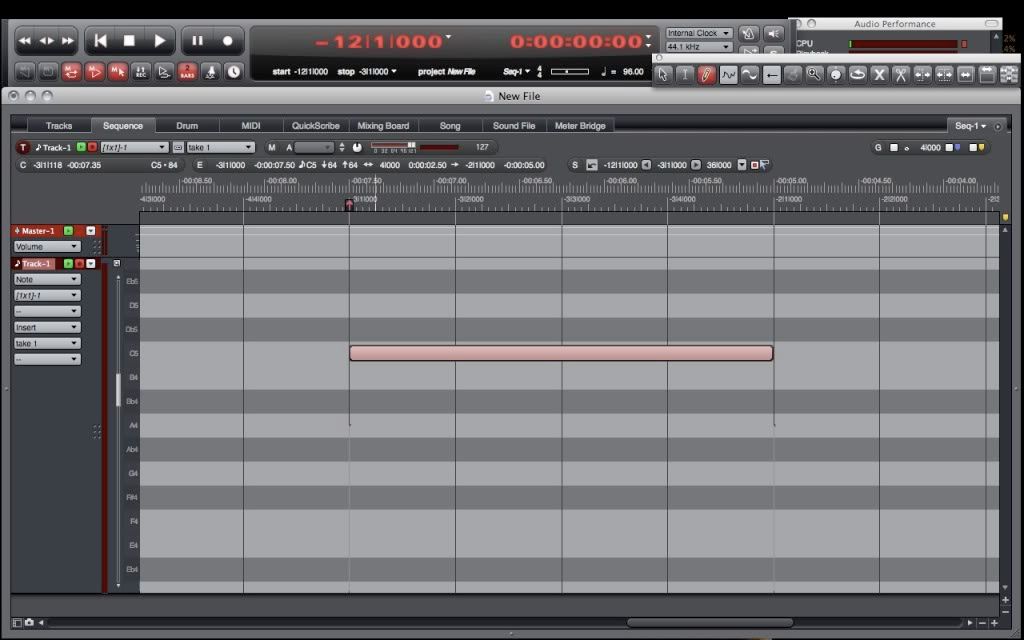
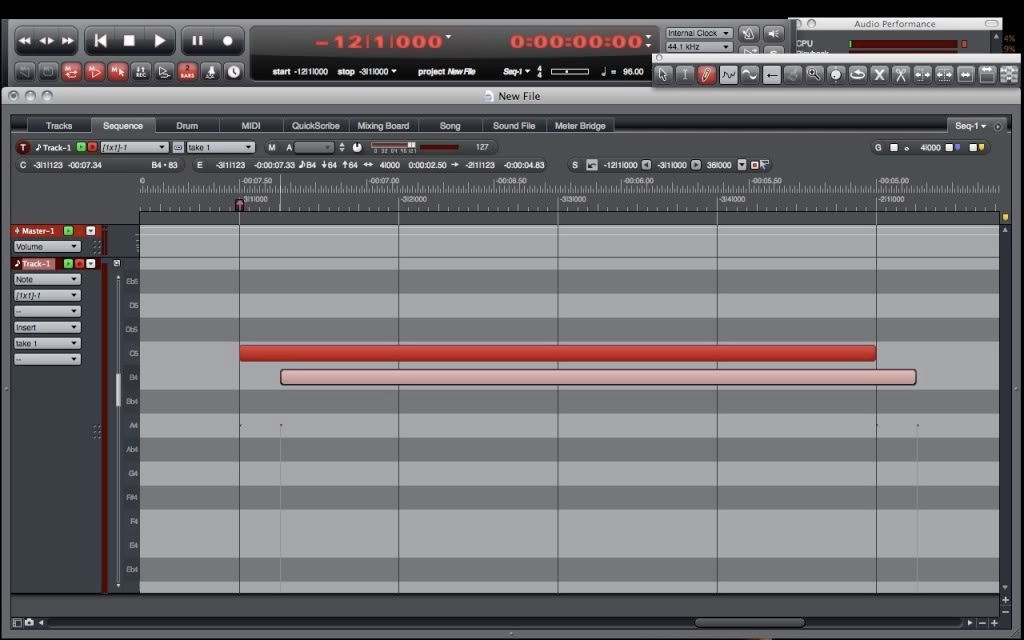
High Zoom Levels:
At high zoom levels, it's doing the very same thing, but the "envelope" of your click-drag happens to be wider than the window. So, it will either appear to be placing a giant note whose end points you can't see, or you will try to click-drag, and possibly fail, since the next gridline falls offscreen. If you can't make your drag reach the next gridline, it will either place a very short note where you clicked (on the grid), or it will extend the note to where you drag if you hold down the Command Key.
It may seem illogical at first at high zoom levels, but I promise you that if you play around with it at normal zoom levels, you'll soon see the er… logic… of the pencil tool's behavior at high zoom levels.
To zoom in: Command-Right Arrow
To zoom out: Command-Left Arrow
To Scroll to the next or previous page at any zoom level: Control-Right/Left Arrows
To Move a selected note up or down - Up or Down Arrow. READ THIS The Up and Down Arrow keys have traditionally been used to change the active record-enabled track. No matter which window you're in, hitting the up arrow will move the record-enabler to the next track upward in the Tracks Overview List. Likewise, down arrow moves it down.
This is a conflict. You must resolve this conflict if you want things to work correctly! I suggest changing the "Nudge Up" command to Control-Up Arrow, and the Nudge Down command to Control-Down Arrow. Then your unmodified up and down arrows will go back to changing the record-enabled track.
You change commands in the Commands Window. (Shift-L) You can also learn a LOT of commands by printing out this window (about 28 pages with the fonts section collapsed). This is seriously a very important part of learning DP. Let me show you what I do with them. I make little tabs out of Post-It notes that fold over and grip the pages at the section locations. (Transport, Edit, Quickscribe, Selections, etc. This will make sense when you look at the window) Here are some pictures of what my notebook looks like with the tabs:

And here is a closeup of the tabs (click for photo) (many tabs are not visible here, because they are behind others. All sections are tabbed for reference.)
To change tools:
Pencil: tap P twice, or hold down P for momentary toggle.
Regular Selection Cursor: tap A twice, or hold down A for momentary toggle
Scissors: Tap C twice, etc.
Reshape Tool: R, etc.
Scrub Tool: S
For the complete list, go to the Commands Window and type in "Tool."
Sometimes there are many continuous data points that should be selected with the note. Let's say you have Breath Control for each note, and you want to move some notes around. How do you select the BC points for each note, along with the note and any other pertinent data that goes with it? (volume, pan, etc.) Basically you need to convert an event selection into a range selection. I came up with a workflow that required setting some commands to make it convenient. It is a one-time setup that remains with DP as long as you keep your Commands from being overwritten by new versions. (DP asks you if you want to overwrite or merge commands. Choose Merge.) The upshot is that with two taps on the keyboard, I've got my BC data selected. Takes about a tenth of a second. If you want to learn about it, go to the 2nd page of the Tips Sheet and read this post. There's another one right above it that talks about creating control points and automation points. You might find that to be a good read, too.
My apologies for presuming that you should find all this information on your own. Maybe it takes a lifetime of learning DP to do this. I don't know. I've been using MOTU's music apps (they had the first engraving software: Professional Composer) since 1984, when they were first released. I had Performer soon after (it was released in 1985 or 1986, I don't remember for sure, even though I wrote the Wikipedia Entry on DP, and once knew this stuff. The Wikipedia article has been whittled down to practically nothing. I once told the whole history of DP, as it involves many histories that are pertinent to this niche of the music industry. You can access the original versions and see what it once contained.
I hope that my lengthy explanations above will enlighten you somewhat to the brilliance of DP's grid and pencil tool, as well as many other features that dovetail into these. It took some time to write this, which may explain my reluctance to do so last night, and the resultant annoyance I felt. This is a major tutorial, and yet I write it and it will be gone except by search, and the next person will come and make the same accusations and comments, and once again I'll be compelled to type up all this stuff. So, I have tried to put several things on one page here. Maybe people will find it in a search.
Good tidings. Best wishes, and happy Digital Performing.
Shooshie
James, you're right. It's the C key for the Scissors. I don't know what I was thinking when I wrote that, but it is and always has been the C key.
Benmrx, I apologize for my mood swing last night. Please feel free to ask for all the help you need. After Bongo's last post, I tabbed over to DP and started using the pencil tool at very high zoom levels. While it may seem odd and inconsistent, it's actually VERY consistent, and it behaves as an absolute grid unless you toggle it off with the Command Key. You will understand momentarily.
The "keys" to understanding the pencil tool are:
1) Grid - if the grid is on, the click will place the note on the nearest gridline to the left of the pencil tool. That is "absolute grid." Not relative. Absolute. Set the spacing of the gridlines by typing in the note value in the time-format you are using. Thus, 0|240 is an 8th note. 0|120 is a 16th. 1|000 is a quarter note. And so on.
2) Click-Drag - Click places the note. Drag determines the length. With grid on, both the click and the drag are constrained to the nearest gridlines. The click goes to the nearest gridline to the left. The drag goes to the nearest gridline to the left OR right, whichever is closer.
3) Command Key - toggles the grid off for the click, And/Or toggles the grid off for the drag.
4) 2nd Click on the Same Note - erases the note you just clicked into existence. The pencil has an eraser!
5) Next Insert - your first click-drag determines the length of all subsequent notes until you click-drag again. You can make the notes any length. Click-click-click… very fast.
Now, I will repeat the above in a more userly-fashion:
The behavior of the pencil tool at normal zoom levels (Shift-Command-N for the default zoom level), is quite nice, actually. With the grid on, it will peg any click of the pencil directly onto the beat or subdivision of the beat. That's an absolute grid. Once you click, you hold it down and drag until you've got the length you want. If you want odd lengths, you press the command key while holding down the mouse button, then drag to the desired length.
After the first click and drag, DP's Pencil tool will attempt to make each following note-click the very same length as the first click-drag. In other words, once you tell DP how long you want the notes, it will make them all that length until you tell it to change.
When you want a new note-length, you just click-drag again as described above. Now you've told it a new length, and it will make subsequent clicks the same length unless you add the drag to your click.
High Zoom Levels:
At high zoom levels, it's doing the very same thing, but the "envelope" of your click-drag happens to be wider than the window. So, it will either appear to be placing a giant note whose end points you can't see, or you will try to click-drag, and possibly fail, since the next gridline falls offscreen. If you can't make your drag reach the next gridline, it will either place a very short note where you clicked (on the grid), or it will extend the note to where you drag if you hold down the Command Key.
It may seem illogical at first at high zoom levels, but I promise you that if you play around with it at normal zoom levels, you'll soon see the er… logic… of the pencil tool's behavior at high zoom levels.
To zoom in: Command-Right Arrow
To zoom out: Command-Left Arrow
To Scroll to the next or previous page at any zoom level: Control-Right/Left Arrows
To Move a selected note up or down - Up or Down Arrow. READ THIS The Up and Down Arrow keys have traditionally been used to change the active record-enabled track. No matter which window you're in, hitting the up arrow will move the record-enabler to the next track upward in the Tracks Overview List. Likewise, down arrow moves it down.
This is a conflict. You must resolve this conflict if you want things to work correctly! I suggest changing the "Nudge Up" command to Control-Up Arrow, and the Nudge Down command to Control-Down Arrow. Then your unmodified up and down arrows will go back to changing the record-enabled track.
You change commands in the Commands Window. (Shift-L) You can also learn a LOT of commands by printing out this window (about 28 pages with the fonts section collapsed). This is seriously a very important part of learning DP. Let me show you what I do with them. I make little tabs out of Post-It notes that fold over and grip the pages at the section locations. (Transport, Edit, Quickscribe, Selections, etc. This will make sense when you look at the window) Here are some pictures of what my notebook looks like with the tabs:
And here is a closeup of the tabs (click for photo) (many tabs are not visible here, because they are behind others. All sections are tabbed for reference.)
To change tools:
Pencil: tap P twice, or hold down P for momentary toggle.
Regular Selection Cursor: tap A twice, or hold down A for momentary toggle
Scissors: Tap C twice, etc.
Reshape Tool: R, etc.
Scrub Tool: S
For the complete list, go to the Commands Window and type in "Tool."
Sometimes there are many continuous data points that should be selected with the note. Let's say you have Breath Control for each note, and you want to move some notes around. How do you select the BC points for each note, along with the note and any other pertinent data that goes with it? (volume, pan, etc.) Basically you need to convert an event selection into a range selection. I came up with a workflow that required setting some commands to make it convenient. It is a one-time setup that remains with DP as long as you keep your Commands from being overwritten by new versions. (DP asks you if you want to overwrite or merge commands. Choose Merge.) The upshot is that with two taps on the keyboard, I've got my BC data selected. Takes about a tenth of a second. If you want to learn about it, go to the 2nd page of the Tips Sheet and read this post. There's another one right above it that talks about creating control points and automation points. You might find that to be a good read, too.
My apologies for presuming that you should find all this information on your own. Maybe it takes a lifetime of learning DP to do this. I don't know. I've been using MOTU's music apps (they had the first engraving software: Professional Composer) since 1984, when they were first released. I had Performer soon after (it was released in 1985 or 1986, I don't remember for sure, even though I wrote the Wikipedia Entry on DP, and once knew this stuff. The Wikipedia article has been whittled down to practically nothing. I once told the whole history of DP, as it involves many histories that are pertinent to this niche of the music industry. You can access the original versions and see what it once contained.
I hope that my lengthy explanations above will enlighten you somewhat to the brilliance of DP's grid and pencil tool, as well as many other features that dovetail into these. It took some time to write this, which may explain my reluctance to do so last night, and the resultant annoyance I felt. This is a major tutorial, and yet I write it and it will be gone except by search, and the next person will come and make the same accusations and comments, and once again I'll be compelled to type up all this stuff. So, I have tried to put several things on one page here. Maybe people will find it in a search.
Good tidings. Best wishes, and happy Digital Performing.
Shooshie
